Questions and Answers
Please feel free to add you questions and anwsers.
Links:
Q: How does ssh work?
Secure Shell (SSH) is a popular networking protocol that lets us access a remote computer over an insecure network such as the Internet.
Secure Shell also supports both password and key-based authentication. Password-based authentication let users provide username and password to authenticate to the remote server. A key-based authentication allows users to authenticate through a key-pair. The key pairs are two cryptographically secure keys for authenticating a client to a Secure Shell server.
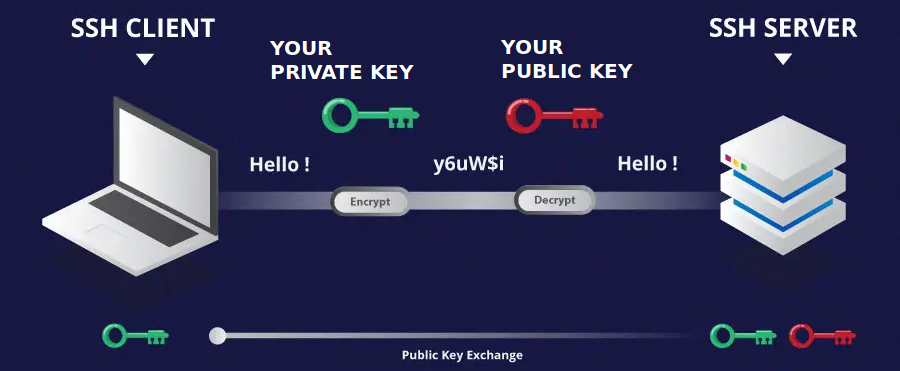
Secure Shell has a client-server architecture. Typically, a server administrator installs a server program that accepts or rejects the incoming connections. Besides, a user runs a client program on their system that requests the server. By default, the server listens on HTTP port 22.
Q: How to use ssh-key authentication?
In order to connect passwordless to a remote server a secure shell key needs to be generated. This key will be used automatically to login.
SSH KEY Authentication
Using this can be a safer way to connect to our servers. However, if someone gets access to your key, e.g. on your Laptop, that person has access to your data/server. Secure your ssh-key. Therefore consider using a phassphrase / ssh-agent.
| How to create an RSA key | |
|---|---|
1 2 3 4 5 6 7 8 9 10 11 12 13 14 15 16 17 18 19 20 21 | |
| How to create a secure key | |
|---|---|
1 2 3 4 5 6 7 8 9 10 11 12 13 14 15 16 17 18 19 20 21 22 | |
It is recommended to use a password to encrpyt the private key .ssh/id_rsa. However, this password is then required each time to login. Using an ssh-agent can solve that problem.
Adding ssh keys to our servers
Remember to use the IPA for adding your ssh-keys, as keys in ~/.ssh/ on all our servers will be ignored.
Q: How to use an ssh-agent?
Using an SSH-Agent will make your connection even safer, as your private key is encrypted with a passphrase. First create a new ssh-key and use a passphrase. Then continue with using the ssh-agent. This agent is installed on all our servers and it is allowed to forward authentication as you go along.
| Using an ssh-agent | |
|---|---|
1 2 3 4 5 6 7 8 9 10 11 12 13 14 | |
ssh-agent on servers
Please use these commands on our servers: ssh-agentstart and ssh-agentreconnect. These commands take care that you do not launch too many agents, killing the system.
adding this to your local .ssh/config will forward your ssh-agent to be used to hop from server to server.
| Allow ssh-agent forwarding | |
|---|---|
1 2 3 4 | |
e.g.
| ssh-agent hopping | |
|---|---|
1 2 3 4 5 6 7 8 9 10 11 12 | |
Nice summary of how an ssh-agent works
Keep in mind that you can use the ssh-agent with KeepassXC, find a nice tutorial here. This is really convenient as it allows you to use all keys in the Keepass as long as it is unlocked. The keys will be automatically removed when the keepass is locked. :)
![]()
Q: How to transfer files between two VPN networks?
You should be able to use an SSH tunnel via a gateway server
Situation
| Text Only | |
|---|---|
1 2 3 4 5 6 7 | |
Assuming you're trying to transfer a file from/to a remote computer ("remote") from/to your local computer ("local"), establish a tunnel via a third computer ("gateway") by typing this on your local computer:
| Bash | |
|---|---|
1 | |
Then you can run an unlimited amount of SCP commands on this tunnel (still typing on your local computer):
| Bash | |
|---|---|
1 2 | |
another option is to use rsync with a gateway command:
| Bash | |
|---|---|
1 2 | |
Note: key-based authentication is required from the gateway to the remote server using rsync. Initial testing showed that using key-based authentication between gateway and remote is required.
Q: How to connect to Jet, Aurora?
Currently there is only login.img.univie.ac.at available from the internet.
Please replace [USER] with your username on these servers and adjust the servers to your needs.
| Bash | |
|---|---|
1 | |
or using the above ~/.ssh/config you can do:
| Bash | |
|---|---|
1 | |
or using the connect script
| Bash | |
|---|---|
1 | |
Q: How to mount a remote file system on Linux (MAC)?
You can us programs like Filezilla or Cyberduck (MAC) to transfer files between remote and local host. But sometimes it is much easier to mount a remote file system and work on it like an external drive.
You can use the mountserver (Download: mountserver) script to do so. This requires sshfs to be installed, on Linux that is in the standard repositories. A short into and some additional steps can be found here.
| Bash | |
|---|---|
1 2 3 | |
This will mount the remote directory to the local directory. The local directory will be created if it does not exist. The directory should be empty before mounting, otherwise that will cause problems.
mountserver
| Mount a remote directory | |
|---|---|
1 2 3 4 5 6 7 8 9 10 11 12 13 14 15 16 17 18 19 20 21 22 23 24 25 26 27 28 29 30 31 32 33 34 35 36 37 38 39 40 41 42 43 44 45 46 47 48 49 50 51 52 53 54 55 56 57 58 59 60 61 62 63 64 65 66 67 68 69 70 71 72 73 74 75 76 77 78 79 80 81 82 83 84 85 86 87 88 89 90 91 92 93 94 95 96 97 | |
Q: How to use an SSH tunnel for private browsing?
based on a tutorial from Linuxize.
It can be really useful to access resources from inside the IMGW / UNIVIE network without using the VPN from the ZID. This can be done super easily. You need an SSH client (e.g. ssh, Putty) and Firefox.
I'm showing the things here only for Linux, but Windows with Putty should be straight forward too. Connect to Aurora for example:
| Bash | |
|---|---|
1 | |
Options:
-N- Tells SSH not to execute a remote command.-D 8091- Opens a SOCKS tunnel on the specified port number.- To run the command in the background use the
-foption.
Authenticate at the server and check that the connection is working. Next open Firefox and go to settings - network and select manual proxy configuration.
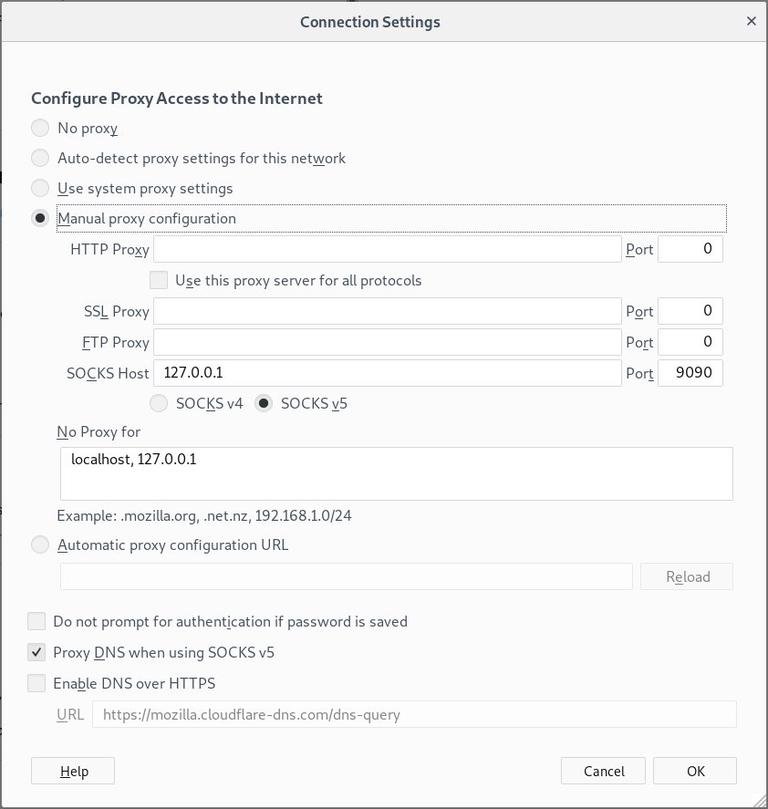
Voila. You can access websites from within the UNIVIE / IMGW network.